One of the joys of attending Family Week at SMBI was agreeing to organize a craft class for all the children ages 6-12. Ryan and I spent considerable time planning and preparing, then he took charge of the boys (18 of them) and I of the girls (28!). For one hour each day, four different days, we coached them through the steps of the craft we’d chosen—checkerboards for the guys, purses for the girls. The children were delightful to work with, and thrilled with how their crafts turned out.
We couldn’t have done it without significant help from a few parent volunteers–Sincerest thanks!
Special thanks also to NiyahBubbly, whose YouTube tips were most helpful. If all DIY videos were as hysterically darling as yours, I would watch them all.
*****
Today I’m going to show you how to make a purse out of fabric, complete with a matching coin purse and flower pin. This project does not require a sewing machine, only hot glue and a minimal amount of hand-stitching.

The lovely thing about the craft is that it takes very little fabric, and could be made from scraps you have on hand. It’s more beautiful when you interchange two coordinating fabrics, so make two if you like, or find a crafting partner to work with you–then exchange coin purses and flowers for a mix-and-match look.
For each set, you will need:
- One rectangle of fabric, 12″ x 30″
- One safety pin
- One button
- One yard of ribbon
- One or two yards of embroidery floss, and an embroidery needle
- Two coffee stir sticks
- About an inch of Velcro
- Scissors
- Fabric glue or hot glue
*****
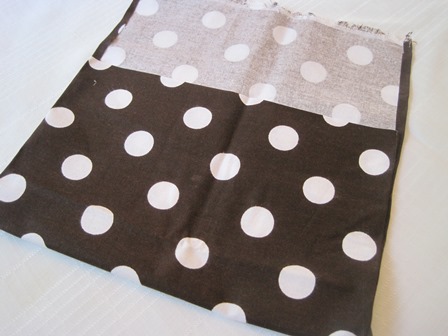
1. Start with a rectangle of fabric, 12″ x 30″ or so.

2. Cut as shown. Specific measurements are not important; straight lines are.

3. Cut the smallest rectangle into a rough circle. From your scraps, save a small additional piece (not shown), about 1 x 1-1/2 inches.

4. First, let’s make the flower pin. Take your long strip of fabric and fold it in half lengthwise.

5. Starting at one end, twist it…

…and coil it, twisting as you go…

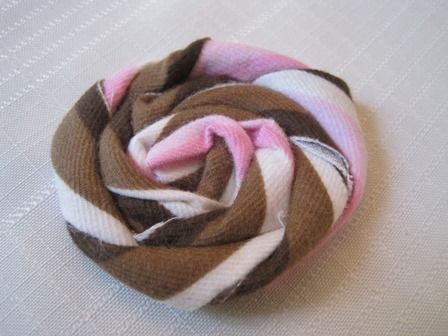
…until you have formed a rosette.

6. Apply fabric glue or hot glue to your fabric circle.

7. Gently pick up your rosette and set it atop the glue, pressing firmly to adhere. Use additional glue to attach any loose places. Trim off any part of the circle backing that is exposed.

(Your flower will look prettiest made with striped or variegated fabric!)
8. Cut the small scrap of fabric saved from above…

… into an hourglass shape.

9. Position with a safety pin as shown, and glue both pin and hourglass securely to the back of the flower. (You could omit the pin and simply glue your flower to the purse; but I think it’s nice to have it removable so you can wear it elsewhere, such as pinned on a dress.)

10. The two remaining rectangles of fabric will become your purse and coin purse. “Hem” each one with hot glue, turning over 1/4 inch on all four sides. (–Unless you want to allow selvedge to show–I think it’s pretty. If your fabric is non-fray, you can skip the hemming entirely.)

11. Your purse will be formed by tri-folding the fabric like this. Position your folds so they look good, with a longer or shorter flap as desired.


12. On the large purse, glue a coffee stir stick to the inside of each fold. This gives extra stability to the purse’s shape, and prevents sagging between the handles.


13. Using all six strands of your embroidery thread, hand-sew a simple whipstitch (tutorial here)…

…or blanket stitch (tutorial here)…

…up the sides of your purse. Make sure to completely encompass the glued hem with your stitch; it will be impossible to stitch through it. Repeat on the sides of your coin purse. (You can simply glue the sides shut, but I think the hand-stitching is what makes the craft charming.)
14. Fold in both sides of the top flap if desired, to expose more of the hand-stitching. Secure folds with glue.

15. Using a sharp scissors or fabric punch, pierce a tiny hole through the flap, just off the end of the stir stick, where you want your handle to attach.

16. Force one end of a yard of ribbon through the hole. (A sharp scissors will do the trick.) Tie a large knot in the fabric end, inside the purse. Secure to the fabric with glue if desired. Repeat with the other end of the ribbon, at the other end of the purse.

17. Cut a small bit of Velcro to become the flap closure. Glue in place, on both the large purse and the coin purse. Glue an ornamental button on the coin purse flap if desired. Pin your completed flower to the large purse flap…
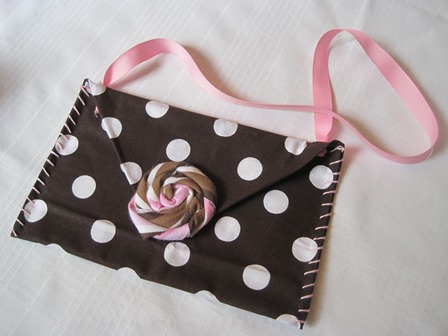
…and you’re done!!


Here’s a work in progress with different fabric:

And here’s my happy class:

My biggest girls:

And my smallest girls:

*****
Any questions? Feel free to ask! I think these would make lovely gifts–but perhaps the gift of time (spent in crafting alongside your niece or granddaughter) would be the best gift of all.
Cheers,
Shari
PS–I am unspeakably thankful not all my blog posts are this long.
Me too!
My daughter is sitting here looking at this with me and saying “Could my age girl make that?” I think we’ll be sifting through our scraps soon!
Thanks!
And I don’t mind long posts when they are worthwhile!
Gina
Is a tutorial on the checkerboards forthcoming?
Yes, coming up next!
I don’t think I’ll be showing this to my girls …at least not til a “rainy” day 🙂 Very cute!!
How sweet!! The girls look so delighted!
That is a BIG group of girls! You went to a lot of work to pull these crafts off! They are beautiful!